

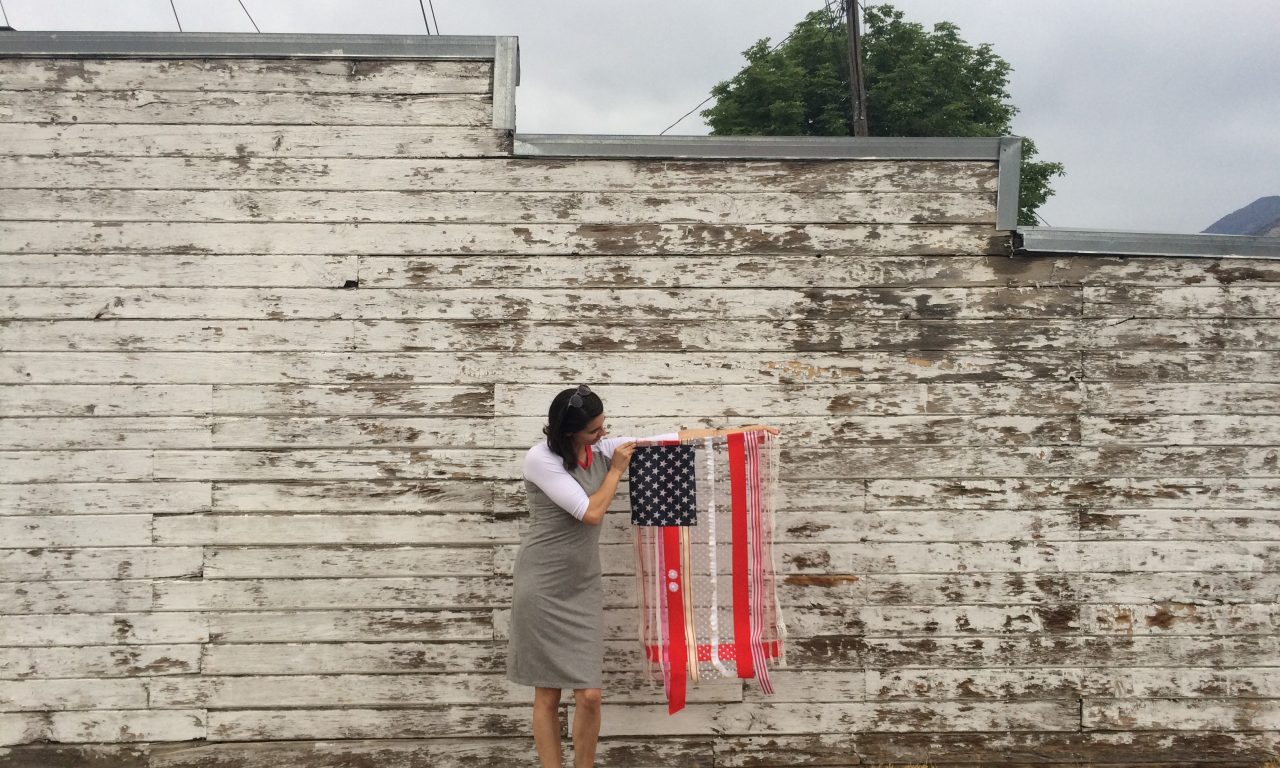
Fourth of July is coming up so I wanted to share a few crafts and projects I did to get ready for the season. One was this ribbon flag that took me less than twenty minutes including prep and craft time. How to make this craft is at the bottom of the page. The other craft was making these american heros printable paper dolls.
 The other day we decorated our home for this weekend. We have family coming from out of town. And where we live the city likes to do alot of fun activities like hot air balloons, parades, carnivals, and fireworks. So to get ready we have gathered lots of red, white, and blue. And while we were hanging flags and buntings I asked my children if they knew why we were celebrating. They had no clue. So I sat and explained the reason behind the Fourth of July.
And part of this discussion was about who helped with the Revolutonary War. We talked about Gerorge Washington and why he was our first president, the crossing of the Delaware, and all he did. We talked about Thomas Jefferson and all those who stood to gain the freedom of the United States. We discussed the women who helped even though it was no encouraged like Molly Pitcher who brought pitchers of water to the soilders and then when her husband became injured on the battle field she helped load the cannons. Rock on! Lastly we talked about the many soilders who gave their lives for us. Did you know over 9,000 African American soilders fought on the rebel side?
I am so proud to be an American and to teach my chidlren about our history. So I want to share these printables with you. You can let the kids color these, connect them with brads or washi tape, or make a garland. You can find instructions on printing these here on my free printables library. Also, I would recommend printing them on cardstock.


I loved the idea of some bohemian Americana decor so I made this ribbon flag. Note that all the materials are not from a real flag. I did research and found that you cannot alter a flag. I also found that however you intend to display the flag the stars or blue should be on the left. I figured the ribbon would hang better downward so I placed my blue square on the top left. Here is the instructios for the Ribbons American flag:
What you will need:
– Enough ribbon that it will go the lenght you want. I made mine 28 inches wide and a yard long. Use a bunch of different types that have different tectures. And don’t be afraid to use different colors too.
-Two pieces of ribbon 28 inches long for the ends.
– Scissors
– Hot glue gun and about three hopt glue gun sticks
-Optional embellishments like daisies or metal buttons
(Note: You could make this a sewing project as well)

How to make it:
1. Plug in your hot glue gun to warm up.
2. Lay out all of the materials and make sure all the ribbon lines up. And place the two 28″ strips on the ends. Determine your oreintation of the flag you will hang and top.
3. Once all the ribbon is aligned in the pattern you would like begin glueing the ribbon along one of the 28″ strips.

4. Once completed go to the other side and make sure the ribbons are tight and all pulled in a line. Glue down the opposite side creating a tight end for the ribbons.
5. Once you have completed gluing the ribbon wrap the ends over the top. I chose to leave the bottom loose but you may want to have a more finished end. So feel free to wrap the edges on both if desired.

6. Glue the square to your left corner of your flag.
7. Add embellishments if any such as floral flowers or stars.

And you are done!! Type questions below and I’ll be quick to answer them. I hope you all enjoy your holiday weekend. I am grateful for our history and those soilders who still today fight for our freedoms. Thank you. Happy Fourth of July.
